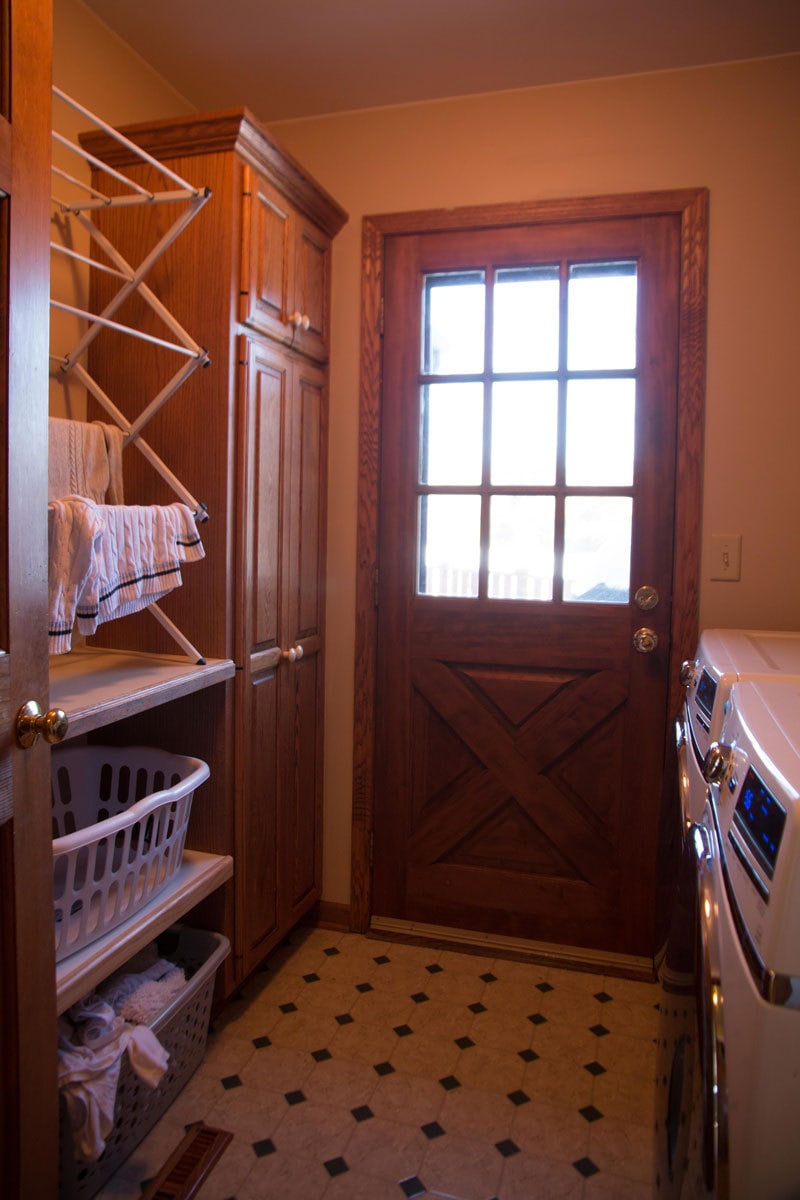
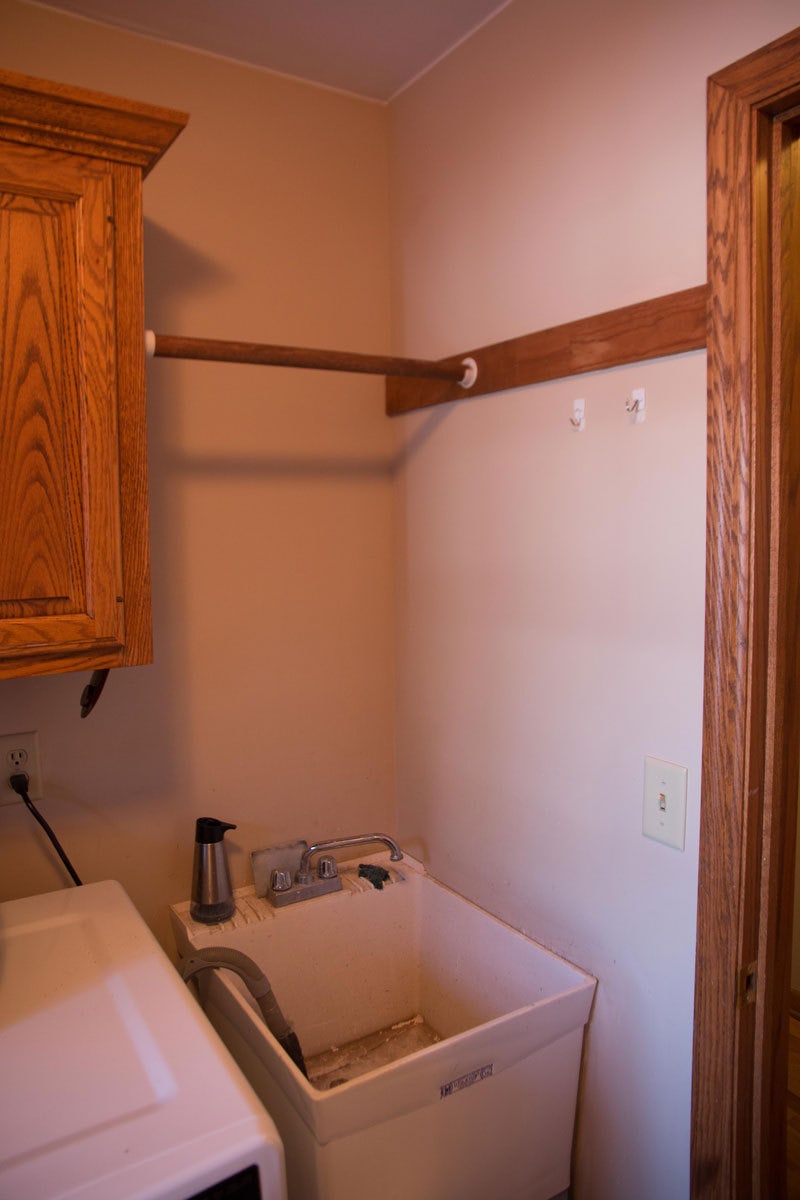
Laundry Room Ideas: Like any other family with young children and dogs, we use our laundry room all the time. However, unlike some others’ our laundry room was incredibly disorganized and dysfunctional. You couldn’t even open the door to the room all the way without banging into laundry baskets, and even switching laundry from the washer to the dryer was hard. Seriously, doing laundry was like an obstacle course with heaps of dirty clothes. And then add some curious toddlers into the mix (one of whom loves to climb into the dryer) and you have an accurate picture of our daily life. So when we were approached by Angie’s List to do a weekend makeover for our laundry room on a $500 budget, we were thrilled yet stumped as to where to start. The laundry room was not only ugly but dysfunctional (see how far we came by scrolling down for some before pictures!)
We wanted the before-and-after to be stunning but also useful. We needed this room to actually work for us! So I am going to take you through key design components and laundry room ideas to consider in your own home, and what we ultimately decided worked best for us.
LAUNDRY ROOM IDEAS
FULL SOURCES LISTED AT BOTTOM
Affiliate links have been used. To see my full disclosure policy please read here.
TRAFFIC FLOW AND USABILITY
You see, our entire laundry room traffic flow was backwards. Back in the ’80s when our house was built, our laundry room was originally designed for use with a top-loading washing machine (hence, no clearance had been allotted for opening a front-loader’s doors) which left us and our front-loaders with a jam. We contemplated stacking them, but then there wouldn’t be any countertop space for pretreating and folding, and it would require taking out one of the cabinets–and you know how much I love hidden storage!
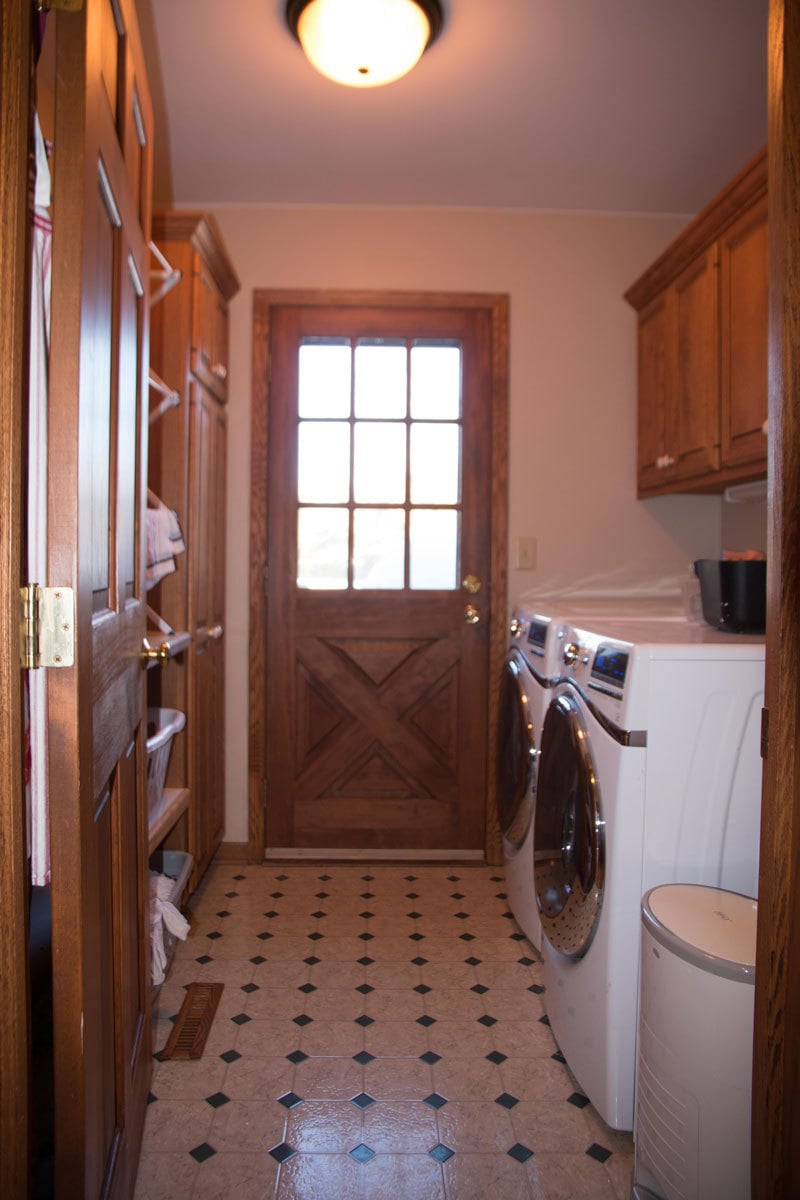
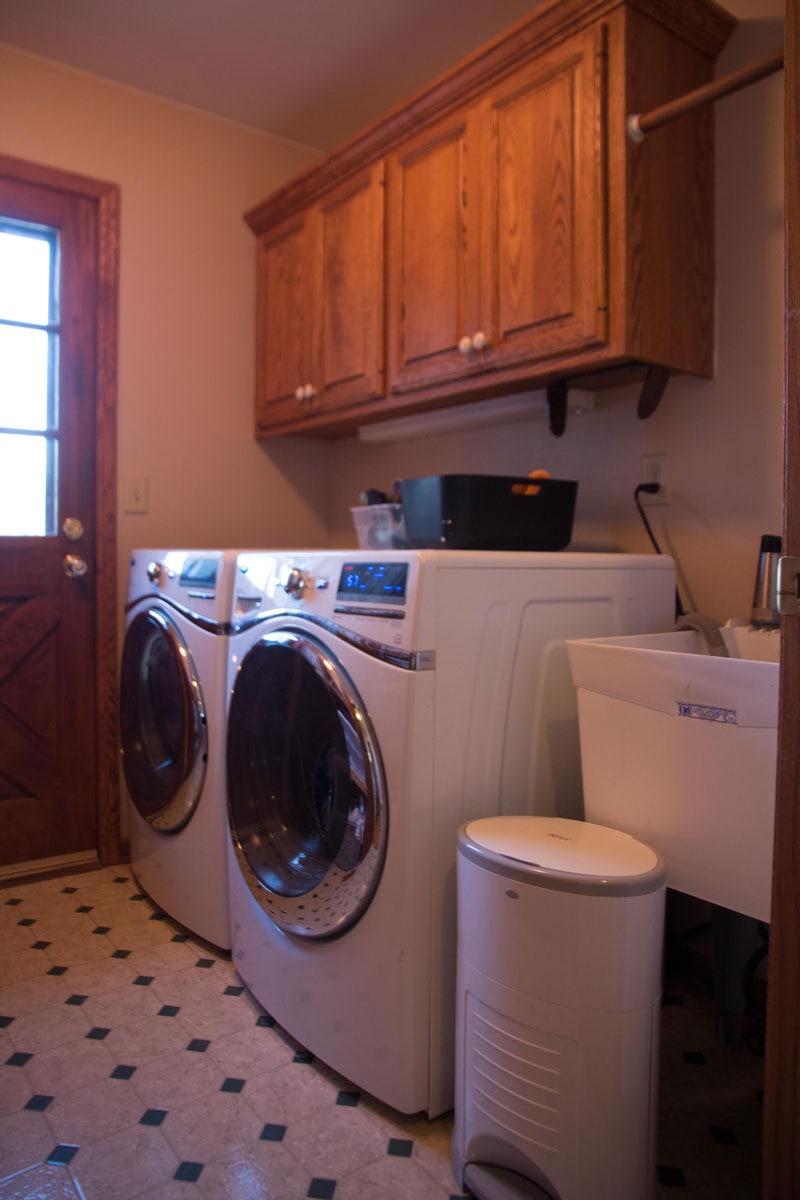
So we decided to keep the laundry machines side-by-side but reverse the order. The washing machine was the closest to the utility sink; but, the door opened directly into the dryer. So you couldn’t easily transfer laundry from one machine into the other. While this seems like an easy solution, it really required quite a bit of behind-the-scenes work from my husband, E. Specifically, it meant changing all of the plumbing, venting, and electrical hookups for both units–a time consuming and tricky job. Thank goodness he is handy! However, through a little research, planning, and several trips to the home center during the week and the weekend, we were able to pull it off.

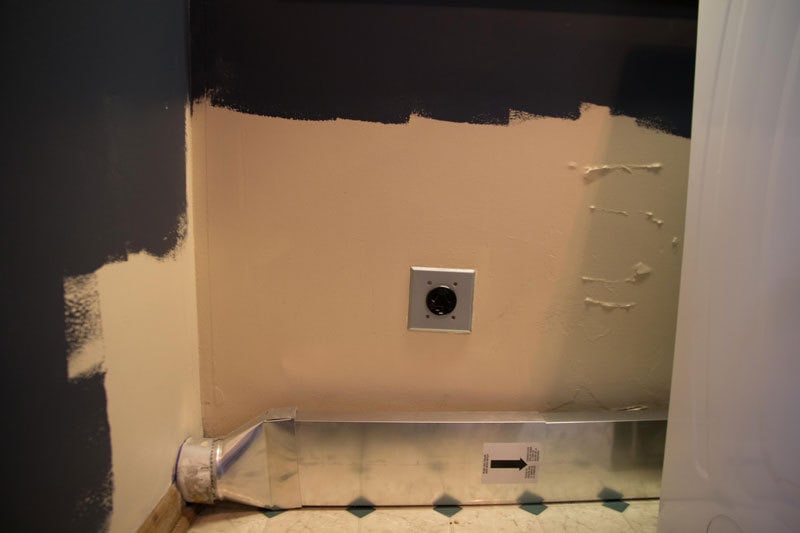
To move the washer, we needed longer water supply lines and a longer discharge hose to reach all the way from the far end of the room to the utility sink. We also relocated the electrical outlet below the countertop so you wouldn’t see the eyesore of the plug all the time. For the dryer we lucked out by finding a clever product called a “periscope dryer vent” (see picture below) which allowed us to route the dryer vent along the wall behind the washer. Fortunately, our dryer is electric (not gas) and the cord reached from the old location so that was one hookup we did not need to modify!
CREATE SPACE & STORAGE
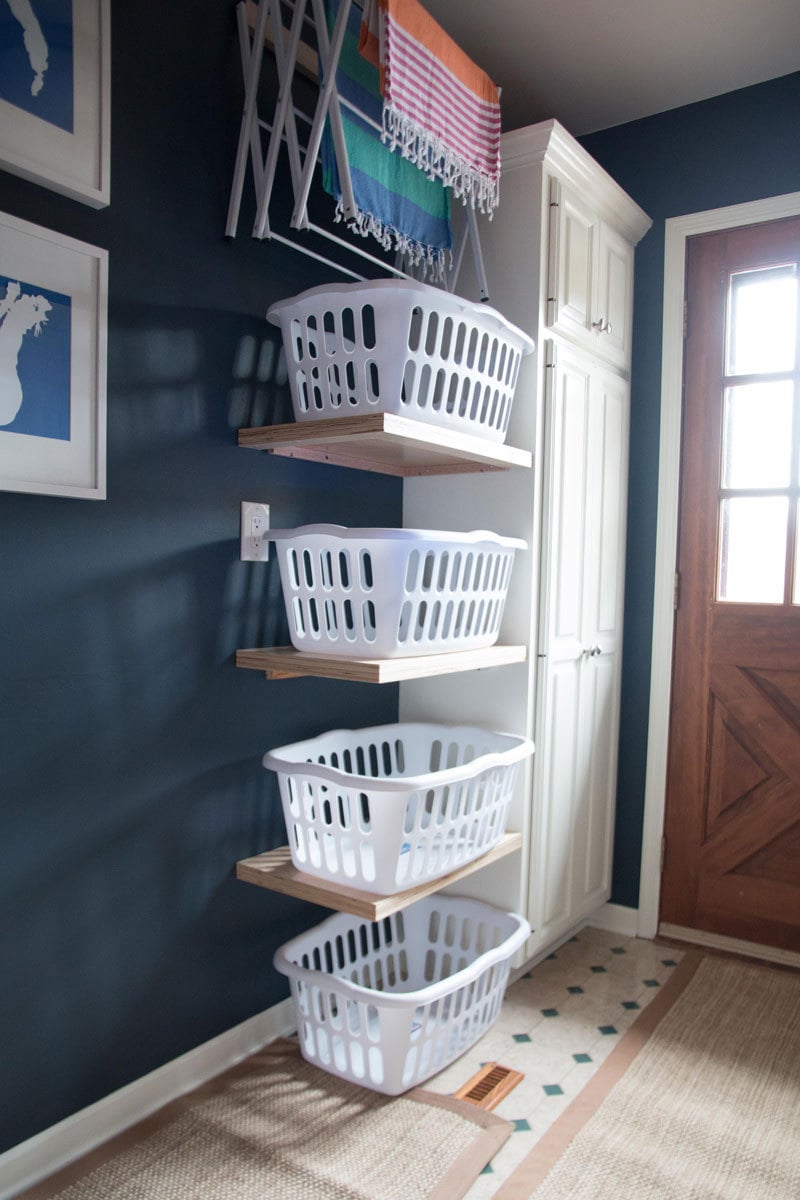
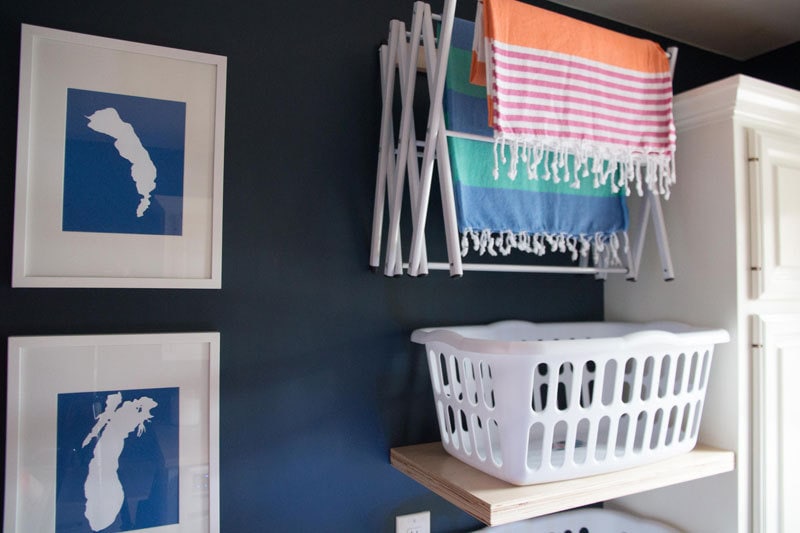
By removing half the length of built-in shelves on the opposite wall and replacing them with smaller half-width shelves, we were finally able to open up the door while maintaining tons of storage for laundry baskets! Previously, with two long shelves spanning the length of the wall, and a drying rack positioned on top, half of the storage was inaccessible by virtue of opening the laundry room door. So we never used that space behind the door and, instead, just piled up laundry on the accessible two shelves (and floor).
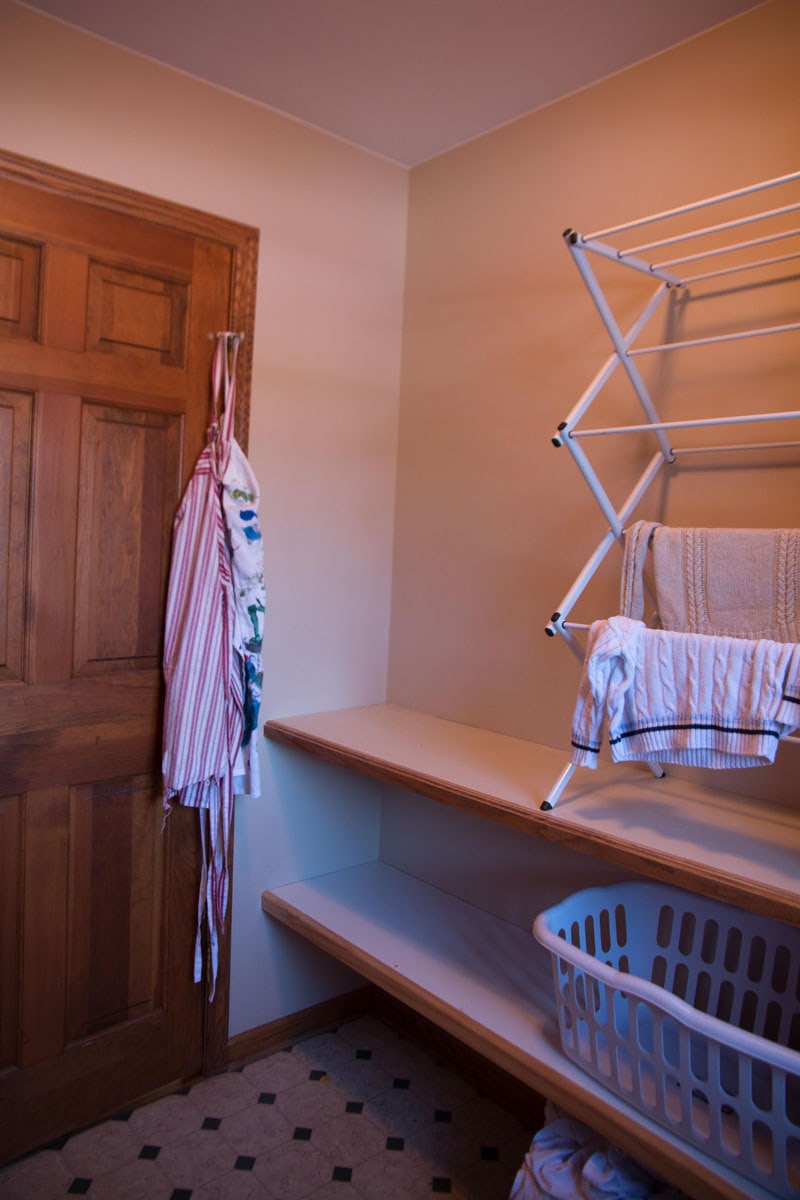
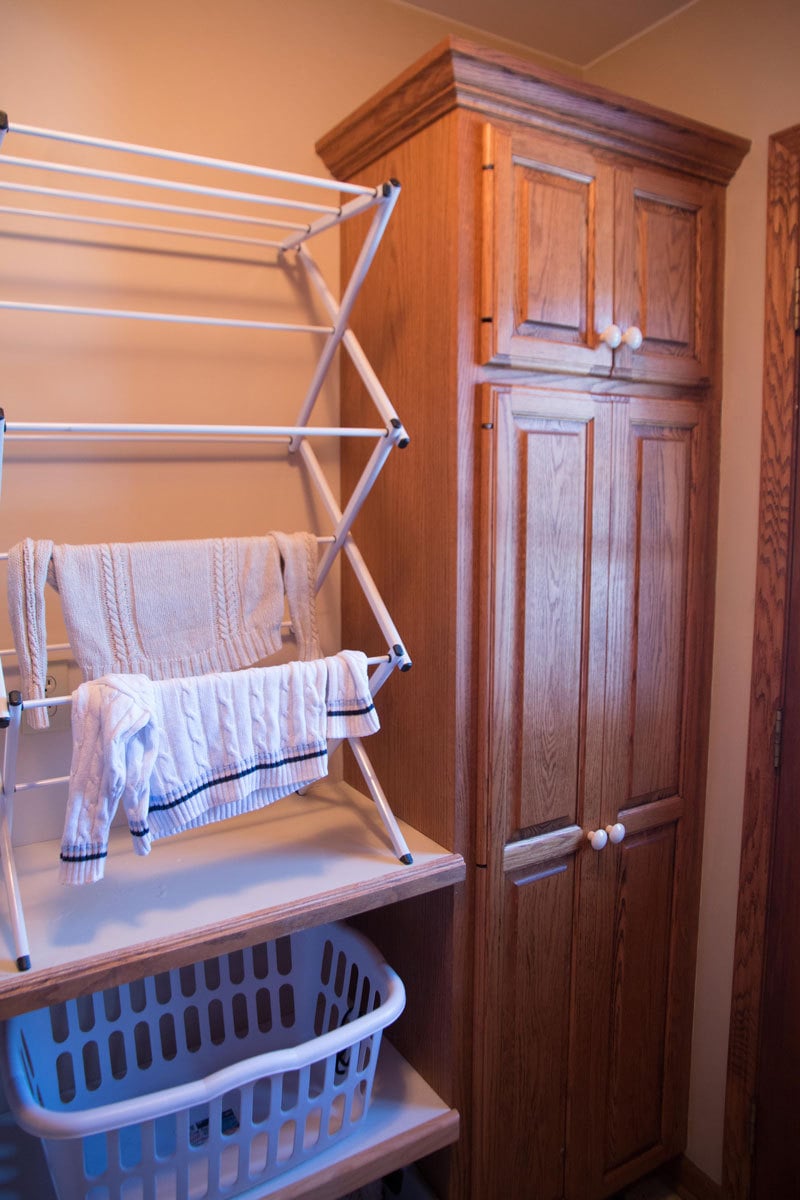
We recognized with how many cloth diapers we use (we use cloth during the day, and disposables when traveling and overnight) we are going to need the drying rack for many years to come. But, it didn’t have to take up valuable counter space. By modifying the existing rack, E, was able to hang it horizontally (instead of vertically standing). Now, whenever I have to hang anything to dry, I just pull out the rack. And with four shelves (instead of two) I can store four baskets of laundry in there!
OPEN WORK SURFACES
We do a lot of pre-treating in our house. With kids that are fiercely independent from day one and will only feed themselves (thank God for baby led weaning and this product) their clothes are constantly covered in messes. So I was always pre-treating our laundry on top of the machine and soaking our microfiber cloths (which I wash separately to avoid lint), so there was never any room to actually put a basket of laundry down.

Furthermore, I was always banging my head into the open cabinet doors because all of my laundry soap and stain removers was stored in there. I didn’t dare store the glass containers on top of the washing machine during the spin cycle!
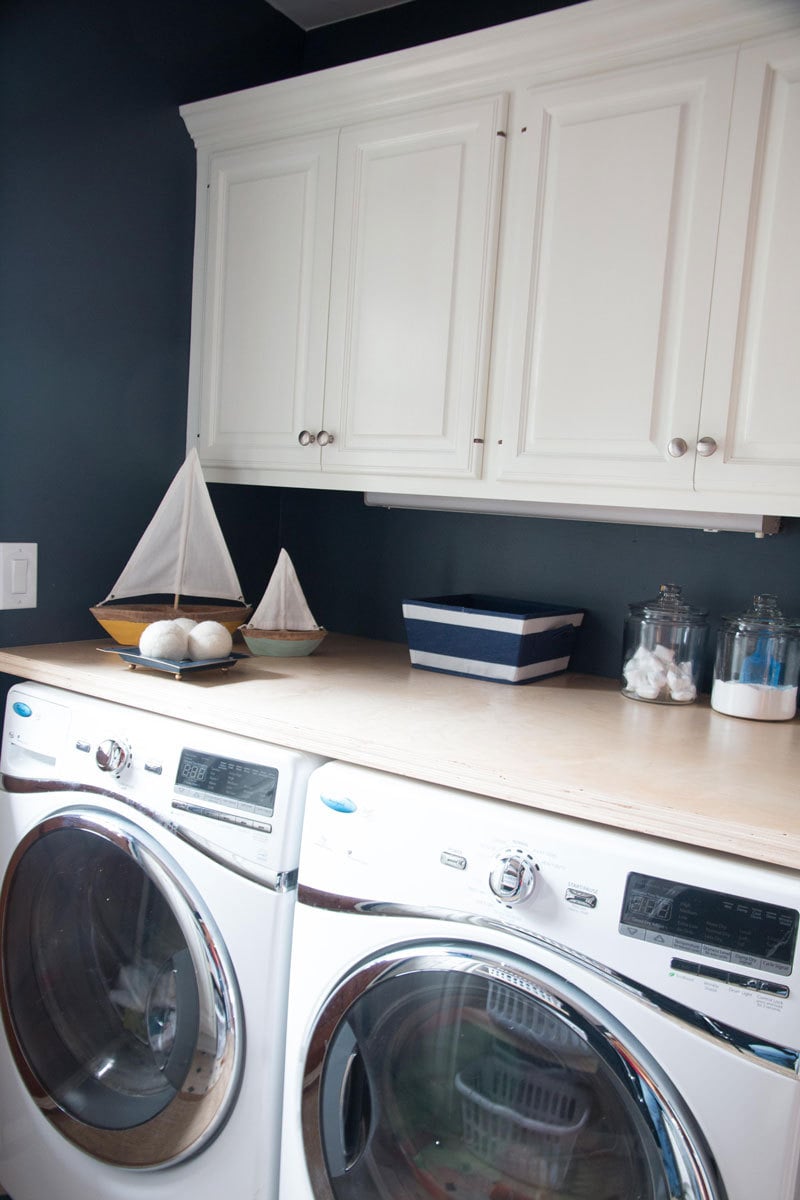
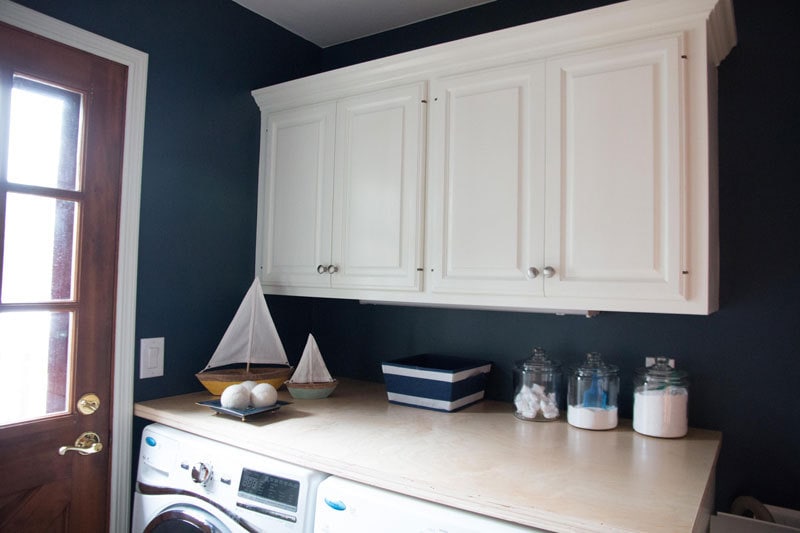
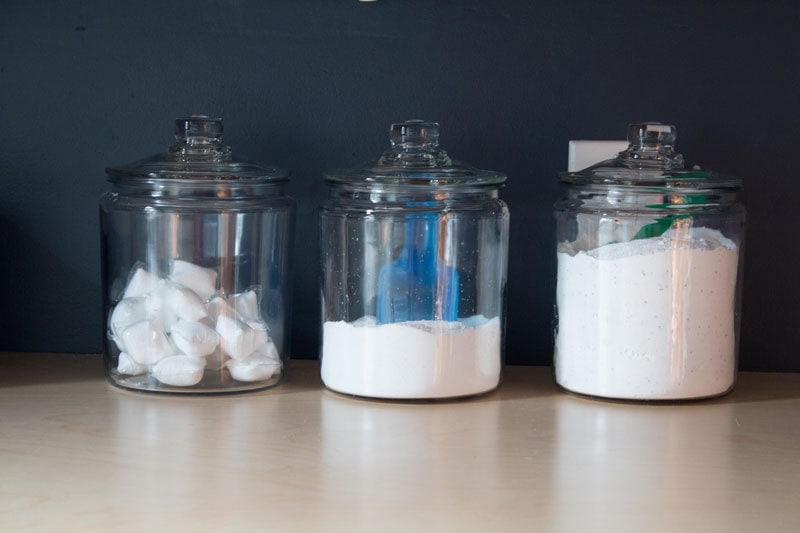
So we installed a budget-friendly countertop made out of pre-finished plywood (upcoming post on all the details). It cost $50 and makes our washer and dryer look more built-in. I now have a spot for all of my laundry detergent, for folding laundry, and for pretreating messy clothes. Heck, I even have room for a small basket in which I collect all the mismatched children’s socks (in my hopes to reunite them with their partners 😉
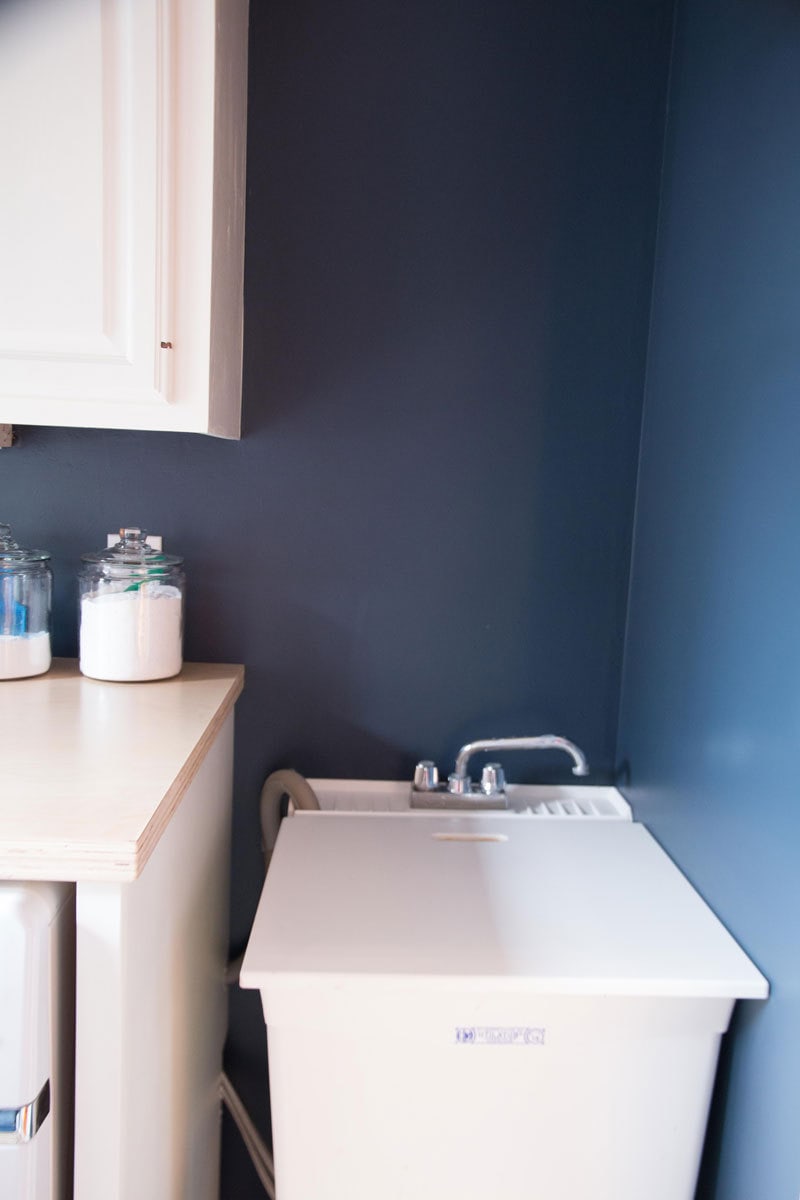
And our utility sink got a proper scrub down and it is now looking better than ever!
MAKE IT PRETTY
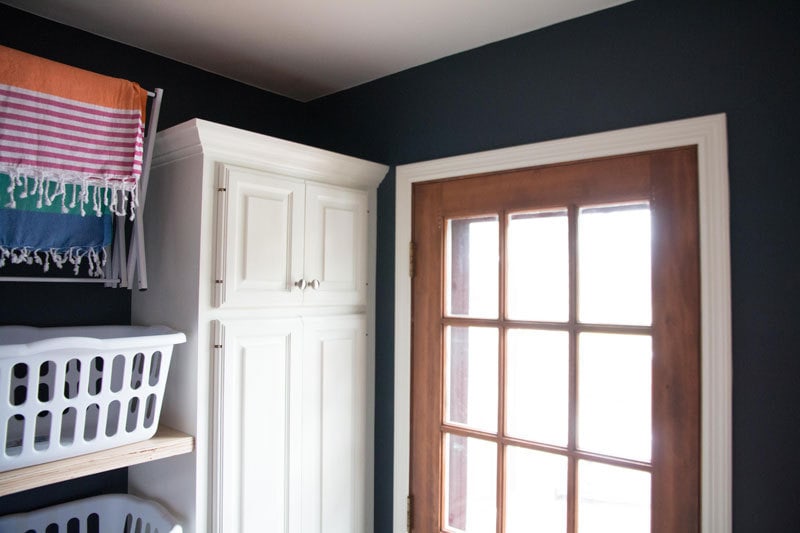
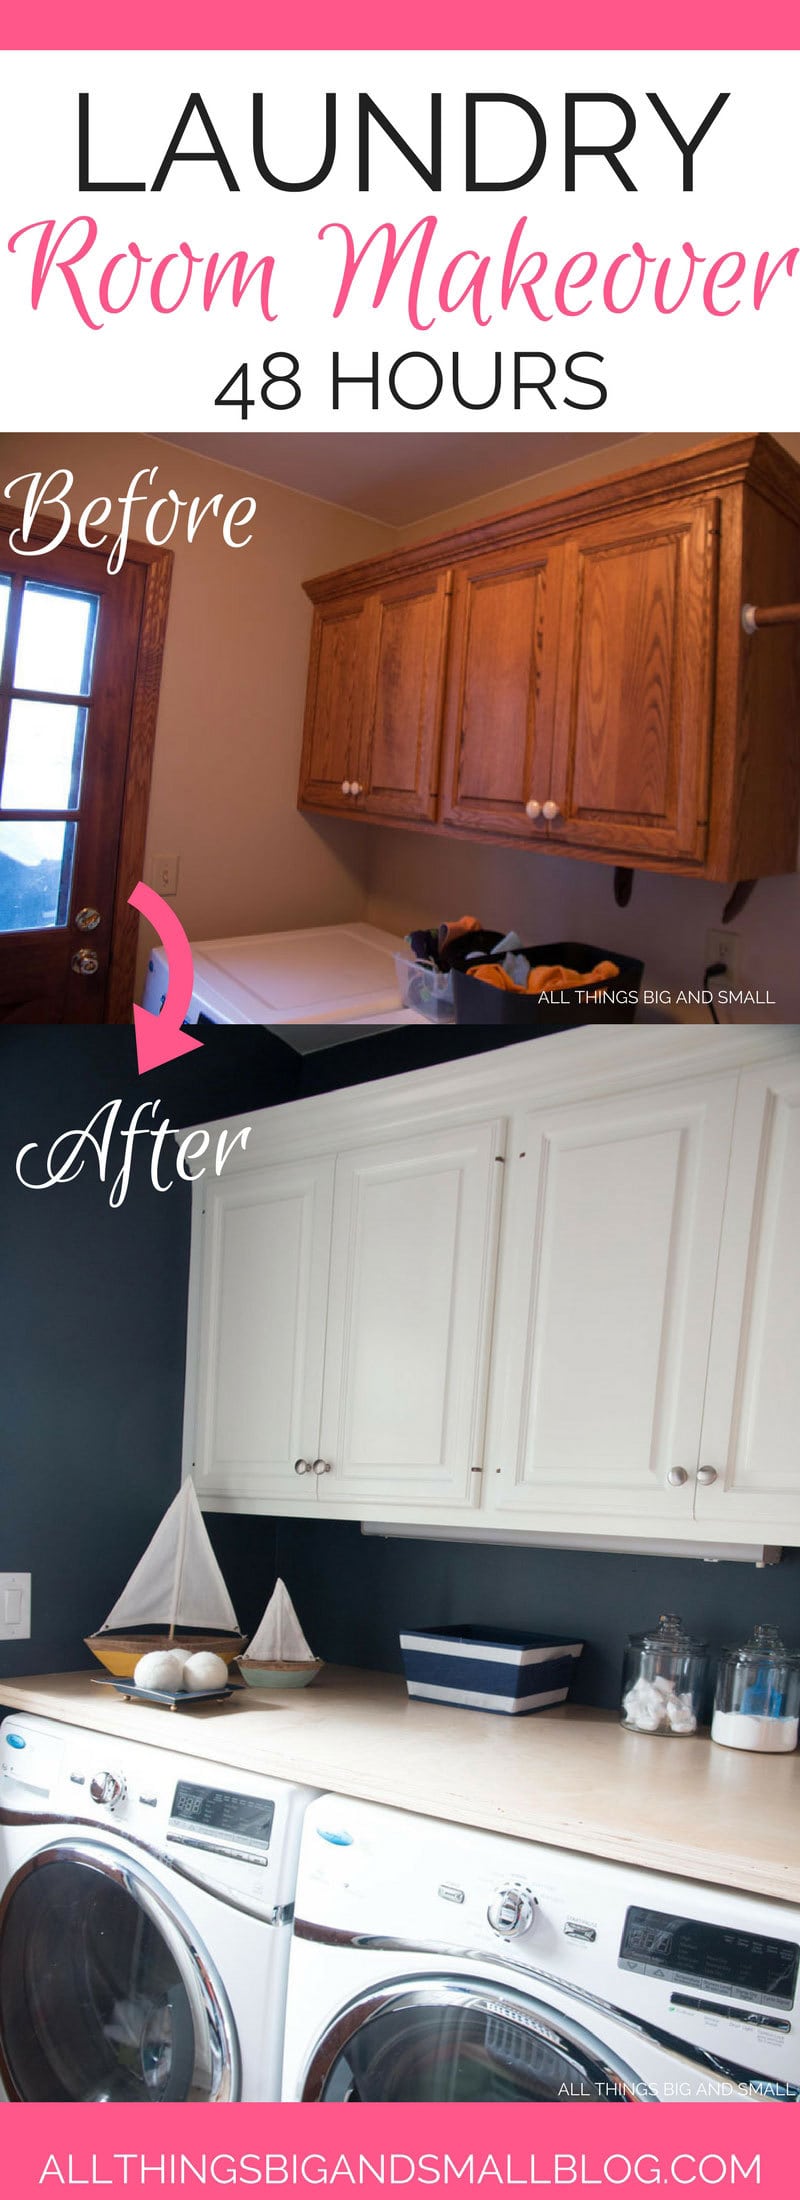
Now, we come to my favorite part of the makeover. It is all well and good to make a room that works better; but, if it is still ugly, I am not going to want to spend any time in there. With a limited budget of $500, we knew that certain things would be out of the question. We didn’t have time to tile a backsplash, replace the utility sink, or replace the floor with what we ultimately want (natural stone.) However, we did have the time and the budget to paint the ugly wood built-in cabinets, trim, and change the brown wall color to a nice crisp blue.
When I thought of a laundry room, I always wanted an airy space with marble countertops, white walls, and cabinets stretching to the ceiling. Well, in 48 hours with $500, that wasn’t going to happen. So, we scrimped where we had to (DIYing our plywood countertops) and painted almost every last inch instead. For a complete guide on painting, download The Designer’s Guide to Painting Your Home or check out this informative post on painting.

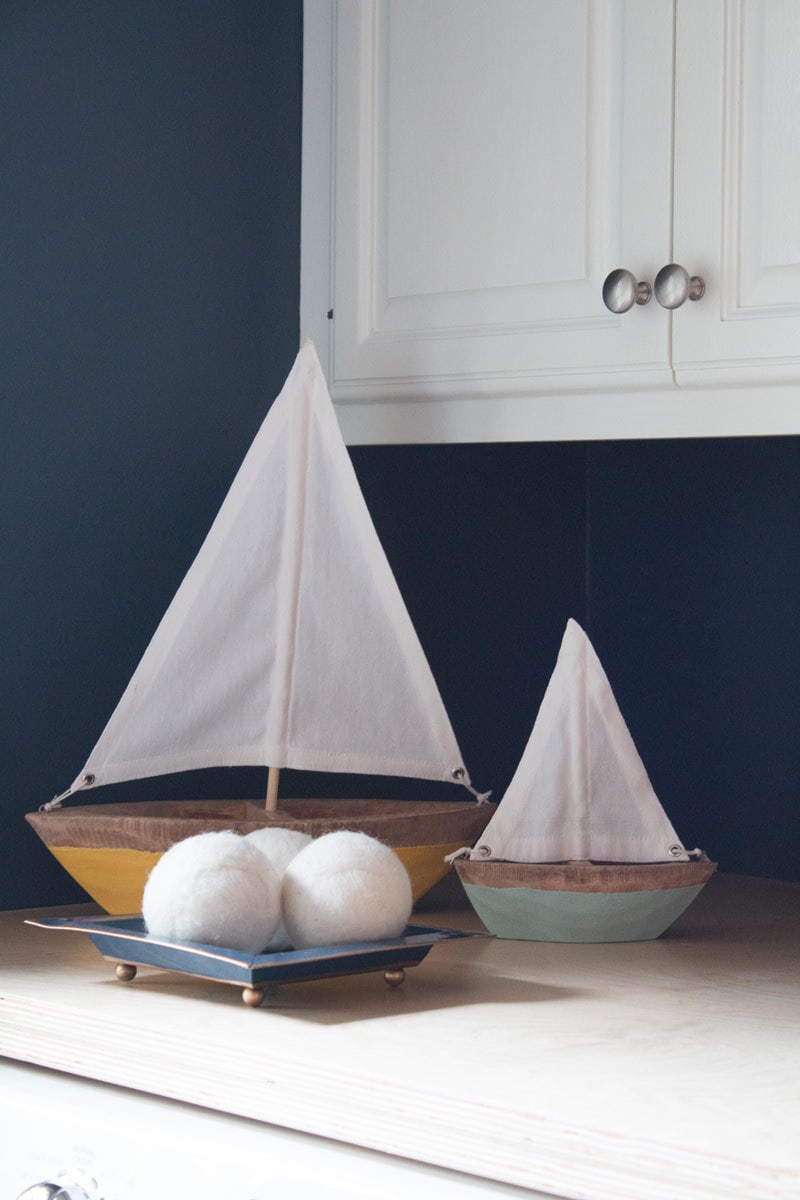
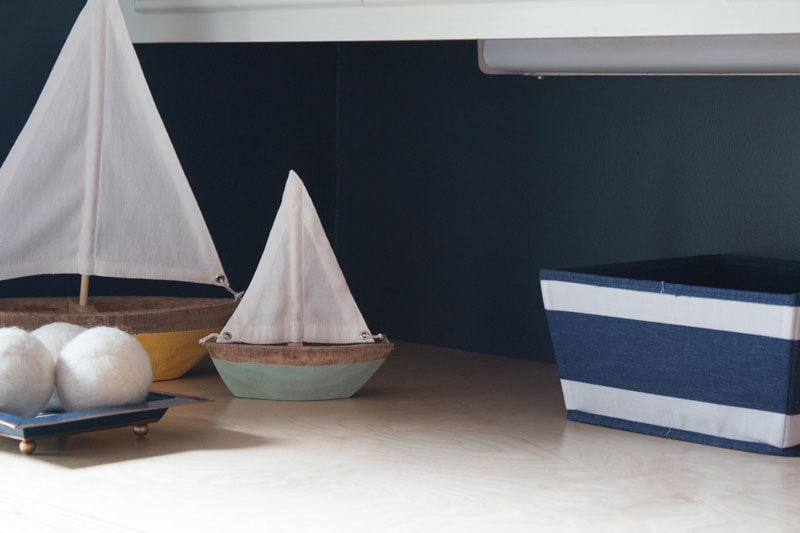
I love how the navy blue provides a clean contrast to the white cabinets and light-colored countertop. With a nautical and utilitarian aesthetic, it makes the unfinished plywood edges of the countertop pop. And by borrowing a few accessories from our kids nautical bathroom renovation, hanging my DIY nautical artwork, and replacing the ugly white plastic knobs with clean polished nickel ones, the entire room was updated. DIY Nautical Artwork
Well, I hope this gave you some great laundry room ideas for your laundry situation at your house! For us, creating a more functional traffic and work flow has made the laundry much more manageable! Going vertical for storage instead of just horizontal and creating a countertop were such big game changers for usability. I would encourage you to think what are the big sticking points in your current design, how could you easily fix them, and where can you save? By keeping the cabinets and simply painting them, using a budget-friendly countertop, and by using lots of paint we were able to completely transform our space in a short period of time!
Curious as to where all the money went?
BUDGET BREAKDOWN: TOTAL SPENT $500
- Paint and Painting Supplies $127 (primer, cabinet paint, and paint supplies)
- Countertops (Plywood and Supplies i.e.) $177 with leftover plywood
- Electrical Supplies $57
- New Light Fixture $60
- Washing Machine and Dryer Reconfiguration Supplies $59
- New Hardware for Doors $20
FUTURE IMPROVEMENTS
- Replace the floor with natural stone or tile
- Install subway tile backsplash
- Replace utility sink
- Paint door a fun color
SOURCES
Affiliate links have been used. To see my full disclosure policy please read here.
Wall color: Benjamin Moore Hale Navy in Natura’s Eggshell
Trim and Cabinet Color: Sherwin Williams Low-VOC Acrylic Cabinet and Wall Paint color matched to Benjamin Moore’s Simply White
Countertops: DIY Plywood (post coming soon)
Glass Canisters: Picked up at Target, similar here
Artwork: $4 DIY Nautical Artwork
Similar Drying Rack here–you would have to retrofit it like we did, or purchase this one for less than $12
Turkish Towels purchased from here but similar available here
Sailboats originally purchased from here
LOVE THIS? PIN IT!
YOU MIGHT ALSO LIKE…
Before & After Nautical Bathroom
Before & After Bathroom Refresh

Looks so great Annie! I love the color and the shelves for the laundry baskets. We have a teeny tiny laundry room and the big regret I have is not getting the front loaders to that I could have had the counter on top. Next time!
the transformation is stunning! I really love the basket shelves.
Wow! So beautiful! I want to do my laundry room now!
I like the changes you made! It wasn’t a completely horrendous space before, but now it feels nice and modern! Great job!
Your laundry room style is very fresh and coastal! Looks like it will make laundry days more pleasant to do.
Maria
Love, love, love! I really wanted to do our laundry room in Navy but I chickened out. Yours looks beautiful and now I want to revisit my lack of follow through, lol.
It looks amazing! I can’t believe how much brighter and cleaner it looks, even with the dark walls. I am dreaming of a laundry room make-over. Maybe someday mine will look this beautiful (then I might even want to do laundry).
Installing periscope vent was a great idea. But did you make sure there are no electrical wires running through the wall in that spot before installing.